Schedule is the crazy variable for moms, right? Between school, sports, and after school activities sometimes it feels like we are running from one event to another, barely stopping along the way. I think there is a whole blogosphere out there dedicated to this topic so that’s all I’ll say, BUT a busy schedule does dictate the way we eat on certain days. Since a semblance of “family dinner” is important to us that means dishes we can have ready to eat when everyone is assembled.
Ina Garten’s Baked Shrimp Scampi is just that dish. Easy to prep in advance from stock ingredients, quick to cook and simple to serve, it fits the bill for busy weeknights and is perfect for company dinner. (It this sounds like advertising copy, well, I have a long history of writing that so … many apologies.) Really, if you are a shrimp fan it’s an easy dish to love.
But, I don’t love the shrimp shells. Have you ever put them in your trash and left it overnight? It probably woke you up! Typically I wrap the shells in the plastic bag they came in, pop them in the freezer, then toss them in the trash on pick-up day.
I’ve often wondered about composting the shells though since fish emulsion is a popular fertilizer and one I’ve used on a regular basis. Shrimp shells are primarily made of chitin and are very nitrogen rich, so it makes sense that shells are a compost enhancer.
The only drawback is, not surprisingly, the fishy odor. My dogs love to try to lick the dirt in the garden when I use it, so imagine what they might do to my compost pile! Even worse, I’m pretty sure shrimp in the center of the pile would be as good as a personalized Evite for all the neighborhood cats.
If you are feeling adventurous, it is possible to compost shrimp shells. Simply dig a hole at least ten inches into the middle of the compost pile, deposit the shells, then cover with well rotted leaves and more compost. This should mask any fishy odors, but if you are hesitant, or you have curious cats (or dogs, or any wildlife around for that matter), here are a few tips that should guarantee odor-free decomposition.
- Boil the shrimp shells for 20-30 minutes.
- Dry out the shrimp shells in a low heat oven (maybe 10-15 minutes at 200 degrees?)
- Grind shells into a powder & sprinkle in compost.
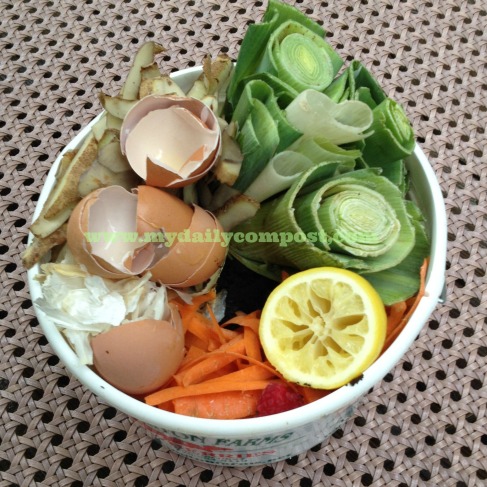
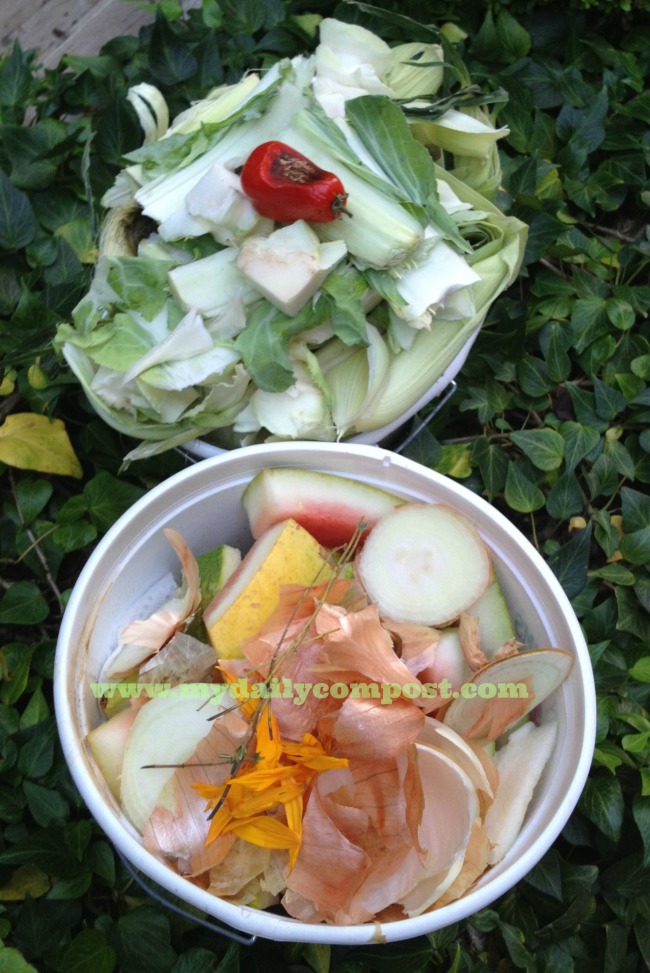
Maybe when I am retired or have plenty of free time in the summer I’ll give this a shot, but until then I’m freezing then trashing my shells. My apologies to the environment. Oh, and here’s my bucket for the day.
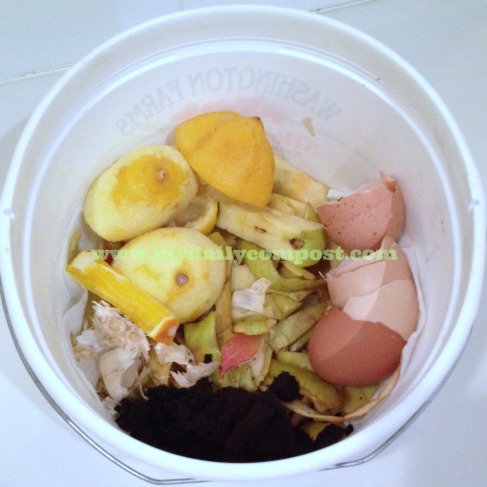
What you can see (clockwise top to bottom)
- cores & peels from six organic Pink Lady apples
- eggshells
- espresso grinds (essential afternoon maple latte)
- garlic stem end
- orange segment
- zested lemon halves
What I made with all of that:
- The above referenced Baked Shrimp Scampi, made with just one pound of shrimp and no shallots because I chose to read Jane Austen instead. Still totally delicious.
- Scrambled eggs with mushrooms and sharp cheddar
- A maple “latte” (Use a lot of freshly brewed espresso, hot whole milk, and a generous splash of real maple syrup. It’s better than a certain coffee shop. Trust me.
- Rustic apple tarts made with leftover dough and the last of my marvelous farm organic apples. These that were made so late they i baked turned into breakfast today. Can I just say this is a great way to start your Friday?

Sorry to leave you drooling.
Tags: Backyard composting, compost bin, composting shrimp shells, fertilizer, fish emulsion, food scraps, food waste, green waste, kitchen scraps, organic composting
This feels like it should be a “which came first, the chicken or the egg” kind of post, but clearly, in my house, it was an egg (no chicken) kind of day. Scrambled eggs, soft boiled eggs, and my favorite, eggs baked into chocolate brownies. These kinds of days are not planned. But isn’t that a lot of shells in one basket?
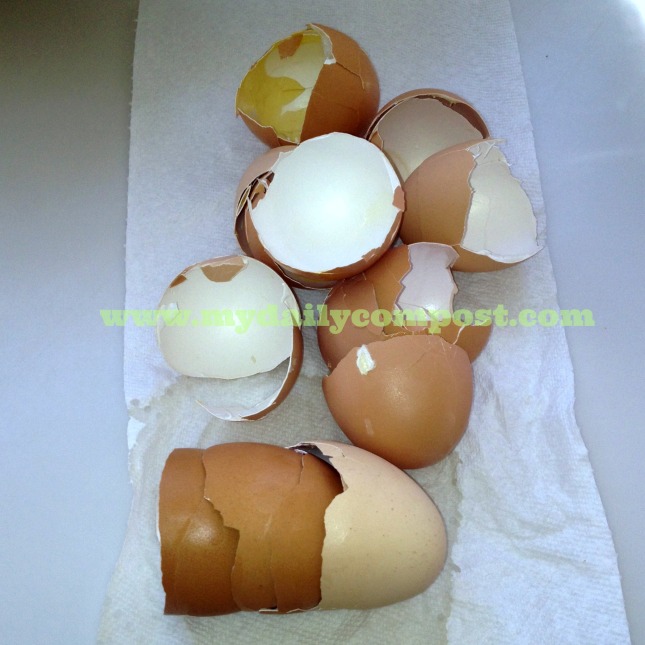
Funny you should ask because there is some discussion as to the safety of composting eggshells. Of course, this is due to the threat of salmonella. It’s a possibility, plus it bends the rule of “no animal products in compost” but it’s your call. Not sure how you feel? Here are a few thoughts and tips in no particular order:
- Since we have already consumed these eggs with no issues, AND since my eggs come from a farm I trust, I feel comfortable putting them into my pile. If composting raw shells makes you squirmy, you can always wash them first. Or, you can bake them at 250 degrees for 20-30 minutes to kill any bacteria.
- Usually I crush the shells with my hands before tossing in the pile but you can toss the shells in whole as well, knowing it will simply take longer to decompose. There’s a hidden benefit to jagged shells though … keep reading.
- If you are feeling particularly ambitious, you can grind the shells in your coffee grinder and sprinkle the powder over your compost heap. That’s a kind of composting megastar behavior I can only aspire to … but just thought I’d share …
- Eggshells are made up of calcium carbonate and in addition to calcium also contain carbon, phosphorus, and nitrogen, plus trace amounts of copper, iron, manganese, potassium, sodium and zinc. That’s all good stuff for your garden!
- If your soil is acidic (like my Georgia clay mix) then all this calcium is a great addition. If you have a primarily alkaline soil you might want to be cautious about adding too much. That said, if you also add citrus peels, which are obviously acidic, then you are balancing out your nutrients before they ever hit your garden beds.
- Speaking of acidity and alkalinity, winter is a great time to get your soil tested before the spring rush. Once you know your soil composition you can tweak your compost to fix or enhance your needs. Cool idea, right? It’s very simple. Just check with your local county extension office for details.
Since we do use a lot of eggs, just for fun, I looked up “other uses” for eggshells. Wow. There are dozens of blog posts dedicated to this subject and ideas range from fun to far out. Homemade sidewalk chalk? Maybe. Calcium rich vinegar? Not for me. But check out all the ideas because I sure there is something there that will make you smack your forehead in a throwback V-8 commerical kind of ah-ha moment.
Maybe if I’m feeling creative and have some spare time I might start some spring seeds in shells, or even make some spring candles in cracked eggs. Most likely though I’ll keep tossing big jagged chunks of shells into my compost. And that’s okay, because slugs (and their ilk) don’t like to crawl over those sharp bits, giving my garden a tiny bit of protection. So, stealthy nighttime intruders, beware! I’ve got eggshells out there!
Tags: Backyard composting, calcium in compost, composting, eggshells, eggshells deter slugs, eggshells in compost, fertilizer, food waste, home and garden, kitchen, organic composting, The Daily Bucket
For a while now, artisan, no-knead bread has been popular among foodie-types, myself included. I particularly like the “even lazier” version of no-knead bread, which minimizes mess and hands-on time. Last week while I was whipping up a batch of no-knead sandwich bread, it dawned on me that my version of making compost is just about the same: minimal fuss, minimal tools, basic ingredients, heat and time.
So, without wasting more valuable time, here’s a step by step guide to Easy, Lazy, No Turn* Compost:
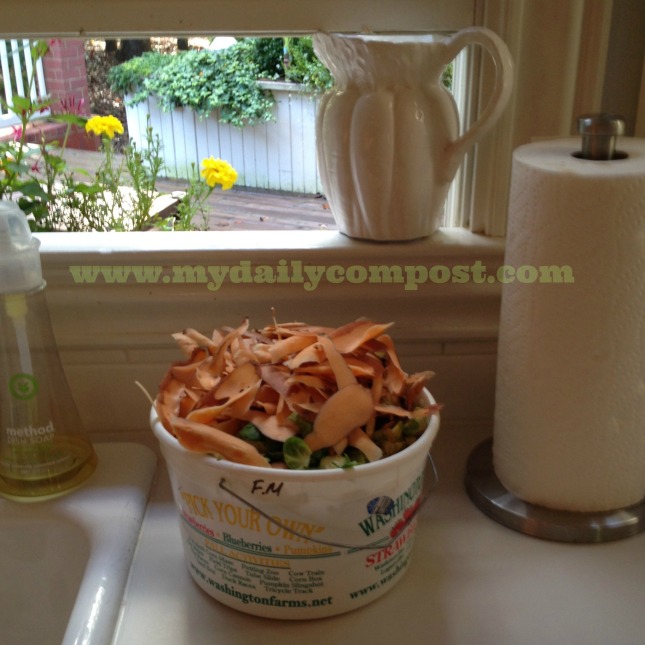
1. Keep a container for scraps handy in your kitchen. There are all kinds and I have this fancy one with a filter, but I prefer to use these plastic berry picking buckets. Each season I get a few new ones & recycle the old yucky ones. I keep my bucket on the sink & everyone know to toss food scraps in there.
2. Empty your bucket regularly. If you are too lazy, it starts to smell … and attract fruit flies and ants… Yuck. We typically fill a bucket every day or two & take it out to this compost pile. The “active” compost pile is where I pile the daily scraps. (Note: We’ll spread the remaining aged compost in a few weeks over my fall veggie bed when my plants are more established.)
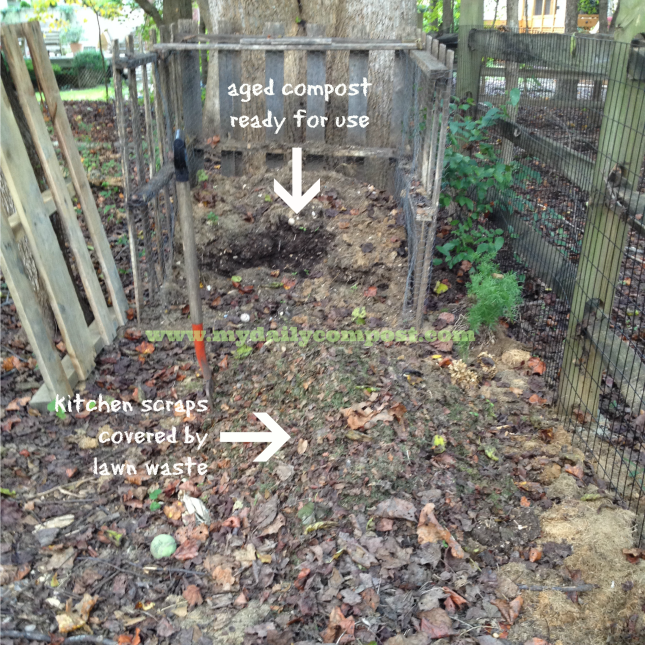
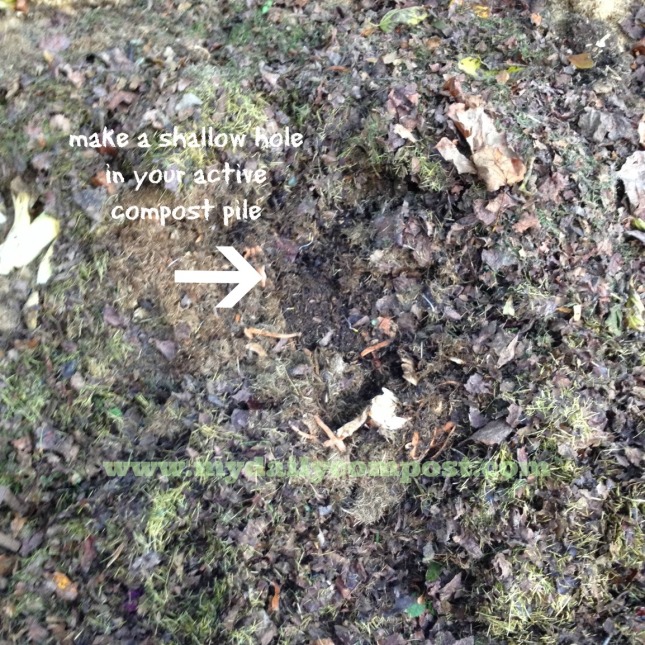
3. Dig a shallow hole in your active compost pile. We keep a pitchfork at the ready beside the pile so that this takes just a moment. It’s kind of hard to see, but here is a close-up of what the pile looks with the hole prepped:
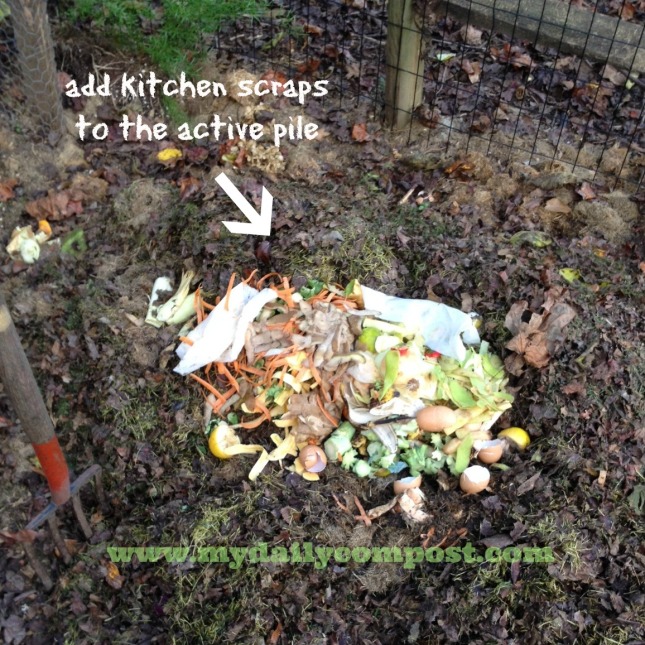
4. Add your kitchen scraps to the hole. Colorful! The discerning eye might spot two paper towels. We don’t use many of them, preferring cloth dish towels & fabric napkins, BUT I do line every bucket with a half sheet of paper towel, otherwise clean-up can be gross. Decomposition starts immediately, even in the bucket.
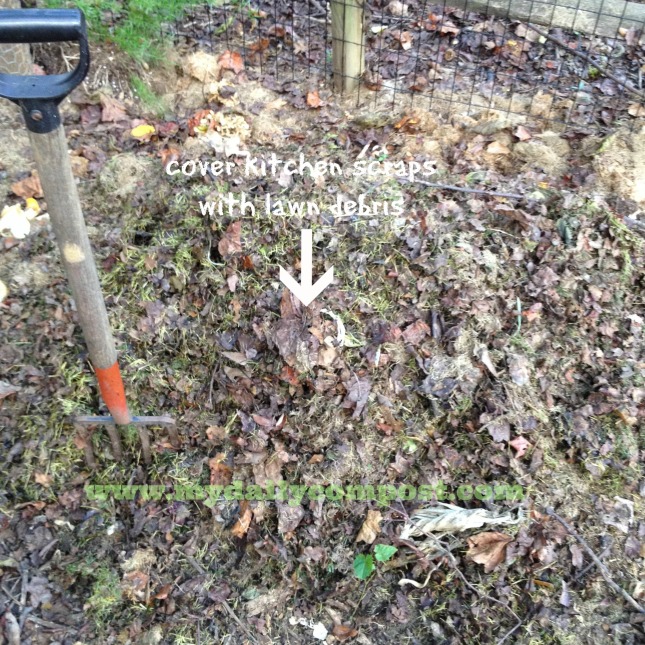
5. Cover scraps with lawn waste. Using your pitchfork, completely cover the scraps with grass clippings, brown leaves, etc. My son had just cut the lawn & leaves were falling, so this is a nice blend of clippings and chopped leaves.
5. Repeat the process every few days. The more kitchen scraps you add, the more compost you will have at the end of the season. I’ve mentioned this before, but organic in, means organic out. If you eat mostly organic, non-gmo produce and don’t use chemicals on your lawn, you’ll be producing rich compost for a fraction of the cost you can buy. WITH PRACTICALLY NO EFFORT ON YOUR PART.
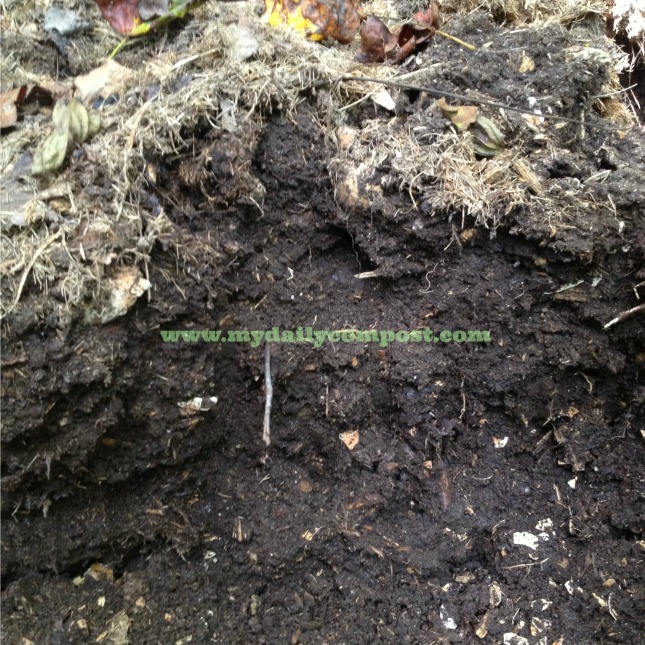
6. So, walk away and let nature work! Rain, sunshine, heat and cold, lots of naturally occurring bugs and microorganisms work to decompose your potato skins, banana peels, and coffee grinds into black compost gold. You can put that back into your veggie beds, annual or perennial beds, or even around your trees and shrubs for happy, healthy plants.
* No-Turn … every compost pile requires some turning to mix the rotting scraps and the fresh additions. We turn the entire pile two or three times during a six-month season. Sometimes more, sometimes less. Mix more if you want to speed up the compost process. Mix less if you are satisfied with a a six-month process.
Happy composting!
Tags: compost, compost bin, composting, Decomposition, dirt, Easy Lazy No Turn Compost, fertilizer, food scraps, food waste, Fruit and Vegetable, garden, gardening, grass clippings, Green bean, green waste, home, home and garden, house and garden, how to compost, kitchen, kitchen scraps, Lawn, recycling, Soil, soil and additives, vegetables, worms
This is the kind of day it was:

Lily wanted to walk, but I preferred to stay warm and snug inside. It was so dark all day that after a cup or two of tea and a more than a few pages of my book, even I was restless. What to do? Normally, rain equals baking in my book, but I was feeling more soup-y. See if you can guess what I made from this bucket:
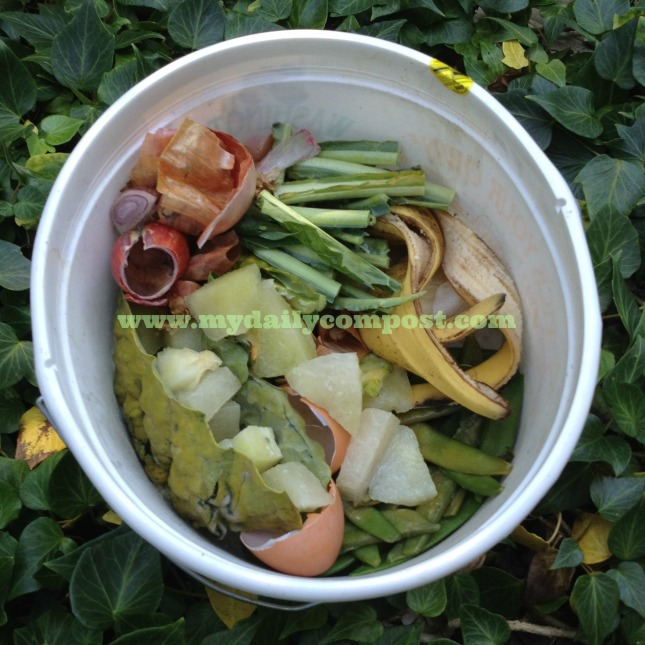
You can tell how rainy it was from where I photographed my bucket: on the chaise underneath the umbrella. Anyway, what you can see (clockwise from the top):
- the tough end & outer leaves of two leeks
- half of a lemon
- scrapings from four carrots
- a moldy raspberry
- eggshells
- garlic paper
- peels from four potatoes
- espresso grounds
What you can’t see:
- skins from two onions
- apple core
- pear core
- more eggshells
- two banana peels
- peel from two cucumbers
- stems from fresh marjoram
- two Tazo “Focus” teabags (my current fave)
What I made with all of that:
- Potato Leek Soup
- Lemony Italian Meatball Soup
- Nutella Pumpkin Pound Cake
- Hammy Cheesy Scrambled Eggs
- Smoothie with Banana, Pear, Strawberries & Spinach
- Pot of espresso turned into my version of Pumpkin Spice Lattes
Happy rainy days to all!
Tags: compost, compost bin, composting, Cook, dirt, fertilizer, food, food scraps, food waste, green waste, home, home garden, house and garden, how to compost, kitchen, kitchen scraps, Soups and Stews
Aside
Over the summer my girl was diagnosed with vitamin D and iron deficiencies. This came as relief because she had been feeling tired, no – exhausted, for weeks with no explainable reason. When a 13-year old walks to the pool and is too tired to swim because of the walk you know something is definitely up. When it happens repeatedly, you visit the pediatrician.
He prescribed 9,000 IU’s of vitamin D and 45 mg of iron daily and they he questioned our diet. Up until that point I had been pretty proud of the fact that we were nearly vegetarian diet, leaning toward vegan (except we all love dairy so that was never going to happen). My kids have never been completely fond of red meat so it was easy to drift to the land of grains and fruits and veggies. It tasted clean and it felt socially virtuous. I invented veggie cookies so, naturally, we should be vegetarians, right?
“Make sure she eats red meat,” said the doctor. Um, okay? That was a speeding curve ball and I’m not a baseball fan. Other than grilling the occasional steak or burger I couldn’t even pull any meat centered menus from my brain. Spicy Chickpeas with Broccoli? Check. Sauteed Kale and Baked Sweet Potatoes? Yum. And my daughter was momentarily horrified. Sweet cows with big eyes provide red meat you know? But we were on a mission. Excellent health.
It was a process, but you know what? It was kind of like riding a bike and we easily hopped back on the trail. Funny how when you pair all those veggies and grains with meat (or chicken or fish) meals are appealing and satisfying and yummy. Today, after three months of getting back to a basically “traditional” diet”, my girl has her energy back, her cheeks are pink, and she’s a happy little meat eater … at least a few days a week. It’s actually a lot easier to plan what’s for dinner each night and everyone seems to be generally more satisfied overall.
The key is stay unprocessed! We are blessed to be able to afford quality food, so we have focused on local grass-fed meat, pastured chicken, raw dairy and as many organic veggies and fruits as we can enjoy.
That said, here are two buckets from the last two days. First up: BLT Pasta or Bacon Meatballs, Kale & Orcchiette Bucket. I’m including the recipe because it was pretty awesome if you love grass-fed beef and amazing bacon! My kids actually preferred this pasta minus the “B” components … we are a work in progress!
What you can see (clockwise top to bottom):
- tough lacinto kale stems
- banana peel
- old sugar snap peas (Toss-It Tuesday!)
- eggshells
- yellowed kale leaf
- very yucky old honeydew pushed to back of fridge (Toss-It Tuesday)
- shallot skin & ends
The second bucket is the basis for a pretty classic American meal: Mashed Potatoes and Pot Roast
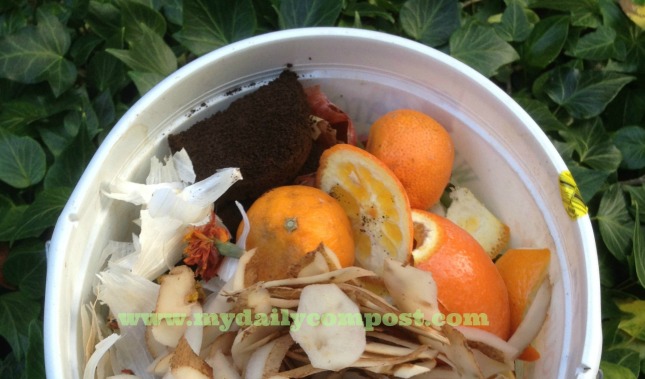
A computer snafu means you only see half of this, sorry! (clockwise top to bottom):
- espresso grounds
- tangelo peel
- peels from six russet potatoes
- garlic skins
- spent marigolds from window herb box
- mushy tangerine
What you can’t see: All the items from the bucket above.
A final note: Meat is actually good for you, but not for your compost pile! Not only is it the source of potential pathogens, will it turn rancid, smell horrible and attract all sorts of animal pests and flies. Do yourself a favor. Eat the meat. Compost the veggies.
Tags: Beef, compost, compost bin, composting, Cook, do not compost meat, fertilizer, food scraps, food waste, Fruit and Vegetable, gardening, grass fed meat, green waste, home and garden, how to compost, iron deficiency, kitchen scraps, Lifestyle Choices, Meat, organic, Red meat, traditional diet, vegetables, Vegetarianism, veggie cookies, vitamin d deficiency
What happens when you pile bucket upon bucket of kitchen scraps into an open bin, add grass clippings and yard waste, and let the sun beat down and the rain pour in all summer? This is what you get:
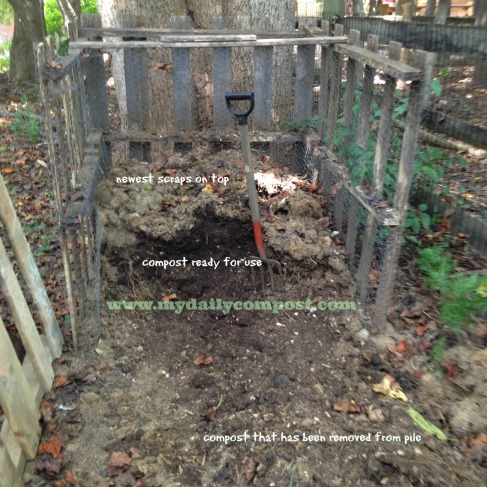
Rich, black gorgeous compost! Here’s a close up of the dirt we (actually my ever-willing husband) dug out:

We figured that this pile of compost represents roughly six months of “work,” which breaks down to approximately:
- 1,000 hours of sunshine
- 38.64 inches of rain
- a whole lot of earthworms (naturally occurring)
- lots of other beneficial bugs and microbes
- 120 buckets of kitchen scraps which could include:
- over 100 eggshells
- likely 100 tea bags (no string, tag or staple)
- scrapings from about 100 carrots
- scrapings from about 100 potatoes
- at least 75 onion skins
- probably 75 banana peels
- most likely 75 lemon, lime, and/or orange peels
- corn husks from at least 60 ears of corn (but no cobs)
- core/stem ends of about 30 heads of lettuce
- skin from at least 25 avocados (not pits)
- grounds from at least 25 pots of espresso
- peels from about 25 cucumbers
- tough stems from about 20 bunches of kale
- rinds from at least 12 whole watermelons
- rings from at least 12 cantaloupes/honeydews
- countless odds and ends from berries, tomatoes, hot & sweet peppers, broccoli stems, brussels sprouts, celery, garlic, and more
- a variety of past-its-prime fruit, veggies, and/or herbs from my Toss-It Tuesday fridge clean-up
- Plus:
- 100 lawnmower bags of grass clippings (not all used)
- assorted hedge & veggie garden trimmings
- at least 1,000 spent rose petals & leaves
- lots of spent spring annuals (pansies)
Phew! Life is complicated enough without worrying about strict combinations of “greens” and “browns” or carbon/nitrogen ratios. Like life, compost is a balancing act. You provide the raw materials, Mother Nature provides the sun and rain, and by the end of the season, you’ve got compost to … start all over again. If we can find time to do, you can too.
Tags: compost, compost bin, composting, dirt, fertilizer, food scraps, food waste, Fruit and Vegetable, garden, gardening, grass clippings, green, green waste, home, home and garden, how to compost, Husk, kitchen scraps, Mother Nature, organic, recycling, Tea bag, vegetables, watermelon, worms
Perfect Atlanta weather calls for a perfect Sunday schedule: Mass, soccer game, grandparents for dinner. We were able to check the boxes for everything! Sadly, we lost the soccer game AND the Falcons lost AND Florida lost too. Come to think of it, Azarenka lost as well … but life is not all about sports! It’s about food! Here’s my Sunday lineup:
What you can see (clockwise top to bottom):
- A rotting homegrown plum tomato (darn!)
- Cauliflower leaves and core
- Husks & silk from six ears of corn
- Watermelon rind, Vidalia onion tops & skin,
- Sunflower petals
- Thyme stems
What I made with all of that:
- Local grass-fed Beef Burgers with Applegate Farms Sunday Bacon, Gorgonzola Cheese and Sauteed onions on on Buttered, Toasted Egg Buns
- Corn-on-the-cob
- Roasted Potatoes & Cauliflower in Dijon Vinaigrette
- Watermelon
Here’s to late yummy late summer meals!
Tags: Atlanta, compost, compost bin, composting, Cook, Corn on the cob, Dijon, fertilizer, Florida, food scraps, food waste, green waste, home, home and garden, home garden, how to compost, kitchen, kitchen scraps, recycling, Sautéing, Sunday, Sunday Dinner, Victoria Azarenka, Vidalia onion
For ages I have been wanting to make a soaked grain recipe. (These are the kinds of things you contemplate as a trying-to-be-healthy baker.) If you are not familiar with the concept of soaking your grains (flour) before you bake, essentially you are adding an acidic ingredient and “soaking” (basically fermenting) for 12-24 hours helps to make grains more digestible. There is TONS of information out there (here is a good starting point) and I wanted to see if it made any difference in taste. Added nutrients would be a bonus. Since that 12-24 hour prep time is a deterrent in my last minute life, I was excited when the moon and stars aligned finally and I prepped my flour on Friday to make Flour Tortillas on Saturday. Result?
Worth. Every. Minute. Oh my gosh! If you are a taco fan, run right out, get some whole wheat flour, olive oil, salt and good apple cider vinegar and make this recipe. You know how 100% whole week is as heavy as a brick and even 100% whole wheat pastry flour feels weighed down? You know how you eat the taco and leave the tortilla ends on your plate? Not the case here! These tortillas are light, airy and the perfect vehicle for a good filling. In fact, if I hadn’t planned my filling, I’d be tempted to eat the tortillas plain dipped in salsa. They are that good! And I forgot to mention, they are a BREEZE to make role and nothing like their crazy cousins the corn tortilla … (another story)!
Sorry, there’s no photo of the tortillas, but here’s my bucket with all the other components of that meal:
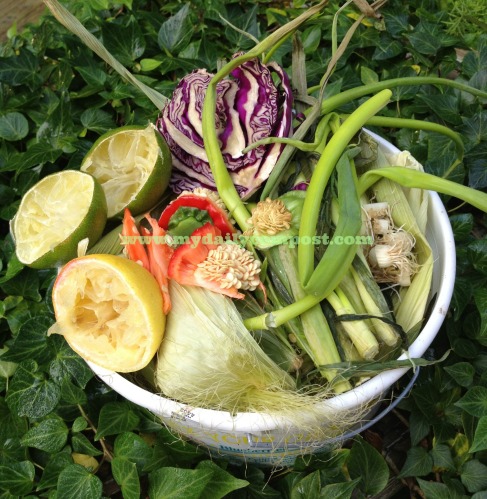
What you can see (clockwise top to bottom):
- Slice of red cabbage
- Lots of wilted, yellowed green onion tops (I’ve been using the same bunch for two weeks and they were at the end of their prime)
- Green onion root ends
- Corn husks & silk
- Lemon & limes
- Red pepper core & ribs
- Poblano pepper core & ribs
What I made with all of that:
- Shrimp Tacos on Homemade Soaked Flour Tortillas, with Red Cabbage Slaw, and Chipotle Cream
- Corn & Black Bean Salad with Peppers & Cilantro
You can tell the bucket is pretty full, so as a bonus, here’s what’s hiding underneath all those husks. Early in the day I took a photo of my morning bits and pieces because they looked kind of artistic on the cutting board:
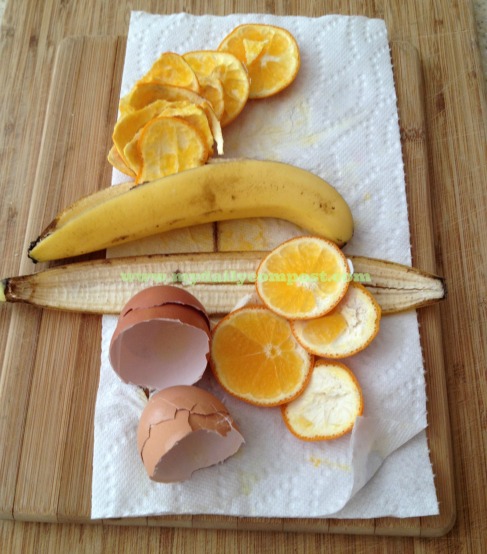
Doesn’t that just scream breakfast? Smoothies & fried eggs & toast. My teens are pretty set in their breakfast ways!
Tags: Air (visual novel), Apple cider vinegar, compost, composting, Cook, dirt, fertilizer, Flour, food scraps, Friday, Fruit and Vegetable, garden, gardening, green waste, home and garden, home garden, homemade soaked tortillas, house and garden, how to compost, kitchen scraps, Poblano, recycling, Saturday, shrimp tacos, soaking grains, Tortilla
You probably already know that roasting a chicken for ONE meal gives you enough leftovers for TWO MORE meals. So, pretend I didn’t tell you that. Typically, I roast a chicken (always organic, pastured if I can get it) every week. That might seem like a lot, but there is usually one gloomy day when we want comfort food. And when there is not, I make a recipe like this.
This bears repeating: Do not compost chicken or chicken bones! Don’t compost any of the herbs or citrus or anything you may have stuffed inside the cavity or veggies that you have roasted alongside. If you want animals digging in your compost heap, adding protein is like sending out a hand engraved invitation to every raccoon, squirrel, and rodent within ten miles. Also, it’s a potential source of pathogens and that’s even worse. So, it makes sense to get every bit of use from that chicken before you have to dump it in the trash.
From these ingredients can you guess what chicken meals two and three were?

What you can see (clockwise from top):
- Carrot peels
- Pear core
- Very yellow cucumber skin (lots of rain this summer, remember?)
- Onion skin
- Orange peel
- Parsnip peel (also in center of bucket)
- Lemon
- Eggshell
- Basil stem
From this bucket, I made a cool lemon chicken salad. I simply picked off the leftover meat and mixed with a peeled & seeded cucumber, a handful of fresh sliced basil, juice & zest from one lemon, and a tablespoon of mayo. Lots of pepper and a little salt along with a handful of arugula and piled on a little buttery sandwich bun. I should have taken a picture. It was an easy, pretty and YUMMY lunch.
I also made my indispensable, old standby chicken stock. If you’ve never made stock before, get our your stockpot (or crock pot) and simmer a batch on a cool morning. There any number of recipes but I’ll share my go to with you:
Chicken Stock
- roasted chicken carcass with meat picked from bones
- onion, medium studded with cloves, about 12-15
- 2-3 carrots, peeled & trimmed, cut in 2-3 pieces
- 1-2 parsnips, peeled & trimmed, cut in 2-3 pieces
- 1-2 stalks celery, don’t remove leaves
- small bunch of parsley if you have it
- 2 dried bay leaves
- teaspoon each whole allspice & black peppercorns, tied in cheesecloth, or loose if you don’t mind straining
- Generous tablespoon or more of real salt
- filtered water to cover (4-6 quarts for my pot)
Add chicken to stockpot & cover with cold water. Bring to a boil. Immediately turn down to simmer and remove any scum from surface. When water is clean, add all other ingredients. Bring back to a boil, immediately turn down to a low simmer, cover with lid cracked to emit steam, and simmer for at least 4 hours, or for most of the day. Make sure it is simmering at the lowest setting and not boiling or it will be cloudy.
When done, allow to cool. Remove carcass and discard (trash). My kids like to eat the root veggies, but I discard everything else. Strain soup to remove any extra spices or debris. Then you can add noodles and more veggies for a chicken soup, or use stock for any recipe that calls for chicken stock. I keep this in fridge if I know I’ll use it in 3-4 days, or freeze it in wide-mouth mason jars for longer storage.
Homemade chick stock makes your house smell divine and tastes better than any store bought stock. Plus, you can customize it endlessly. Switch out veggies and herbs. I like to add chili peppers and a cinnamon stick if I’m making a spicy corn chowder, or leeks and garlic if I am making potato soup.
Tags: Chicken, Chicken soup, compost, compost bin, composting, fertilizer, food scraps, food waste, Fruit and Vegetable, gardening, green, green waste, home and garden, home garden, Homemade Chicken Stock, how to compost, kitchen, kitchen scraps, lemon chicken salad, Parsnip, recycling, stock, what not to compost
Are you like me? I look at each bunch of attractively arranged leafy greens and herbs at the market and imagine all the yummy dishes I can make … I buy a bunch or two (or three), and feel so virtuous when I use them immediately. I try to plan my meals around using these delicate beauties first. Anyway, not this week. I managed to push these greens to the WAY back of the fridge where I kind of L O S T them… Here’s another yucky episode of Toss It Tuesday … At the last minute I added dinner scraps too.
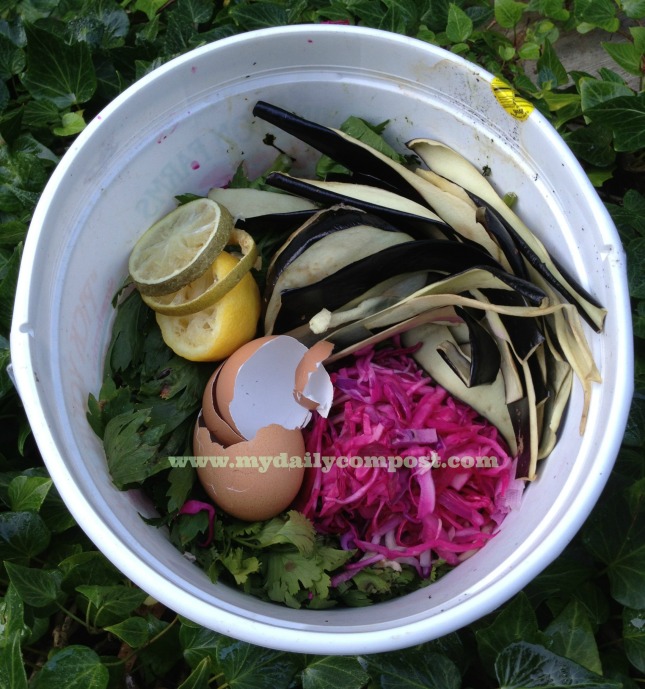
What you can see (clockwise from top):
- Eggplant trimmings
- Leftover slaw from Labor Day (love this so much and forgot to stick it in the fridge – argh)
- An entire unused bunch of cilantro (my most favorite herb, right behind thyme, and basil … an herbal bronze medalist … just FORGOTTEN)
- Eggshells (These posts make me realize we eat A LOT of eggs!!! These were breakfast. Again.)
- Celery tops (once gorgeous, now slimy. Actually grew the celery in my own dirt and put the tops aside for “later”. Thank goodness there is still more in the garden.)
- Lemon & two lime slices (lemon was for hot lemon water to start the day & limes from a Starbucks refresher. It’s my daughter’s go-to treat)
My resolution this week (and every week): USE ALL THE FOOD I BUY.
Tags: Celery, compost, composting, dirt, fertilizer, food waste, Fruit and Vegetable, green waste, home, home and garden, house and garden, how to compost, kitchen, kitchen scraps, Labor Day, Leaf vegetable, Lemon, recycling


